Local Installation
This installation is tested for a Mac (M4 / Sequia) using VSCode. First you need to install mini-conda.
Install mini-conda (if not already installed)
We choose the mini-conda version of anaconda, since it is much smaller and faster to install. See https://docs.anaconda.com/miniconda/install/#quick-command-line-install to install mini-conda (based on your operating system).
Activate conda
source ~/miniconda3/bin/activate
Activate conda environment
Activate the conda enviroment in the project folder:
conda create --prefix ./env python=3.10
conda activate ./env
Install the required packages (in Conda)
conda install numpy pandas matplotlib seaborn scikit-learn jupyterlab
Install the required packages (in pip)
For pytorch see https://pytorch.org/get-started/locally/
pip install torch torchvision torchaudio keras
Testing the installation
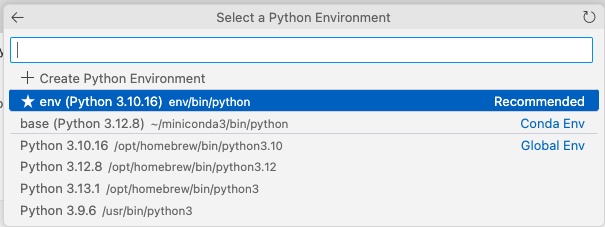
Open the notebooks/00_test_local_installation.ipynb and run the cells. At the beging your are asked to choose a python enviroment. Please choose the conda enviromet like in the screenshot below. It might happen that there is no environment to pick, then it could help to first install the suggested extensions of vsCode (jupyter notebook, python).
🚧 WORK IN PROGRESS 🚧 below that
Installation on a Windows machine
Installation auf laptop mit Anaconda
Beate’s laptop: rufe anaconda prompt auf, gehe in C:\Users\sick\Documents\GitHub\dlwbl_eth25> und dann Commands
Ab “Activate conda environment” ausführen.
Creating a yaml file for easy installation
Save the environment [Optional]
conda env export --no-builds > environment.yml
In the evirnoment.yml you need to change the name of the environment to
Install the environment from the environment.yml file [Optional]
Instead of installing the packages one by one, you can also install the environment from the environment.yml file.
conda env create -f environment.yml